Introduction
Git was created by Linus Torvald to manage the Linux Kernel code after BitKeeper withdrew permission for the kernel developers to use their proprietary system free of charge.
Linus specifically designed git to not be like CVS (which he hated from his time at Transmeta), to support a distributed workflow, provide very strong safeguards against accidental or malicious corruption, and to have very high performance. There later features have resulted in it becoming very popular in the open source world.
Further general information can be found on the git wikipedia page.
Setup
NOTE: The commands in this section should be done before doing any commits. If the –global option is used they only need to be done once, otherwise they need to be done for each repository initialized or cloned.
Name and email address
When you perform commits in Git, Git will record your name and email address with the log entry for that commit. For this reason, it is important that you tell Git your correct name and email address so others know (including you) who did a particular commit.
If you only use one Git repository, or, if you have a “main” Git repository and want default settings, set your name and email address globally using (substitute your first and last name and your email address):
git config --global user.name 'FirstName LastName'
git config --global user.email 'your_email@uwindsor.ca'
If you don’t want to set this globally, then you can omit the –global setting to save it in the current Git repository:
git config user.name 'FirstName LastName'
git config user.email 'your_email@uwindsor.ca'
If you don’t do this, then Git will commit information using whatever user name information is available on the system you are on –which may or may not be correct.
These effects are very noticeable when one looks at the logs for Git (e.g., git log) and incorrect settings can make it difficult to know who committed changes and/or for others to give you proper credit. Another reason to do is that it is very hard (if not impossible) to change logged Git information later.
Cache login and password information
Every time the git command is used and it has to access the remote repository you will be asked to type in your login and password. Constantly re-entering this information can quickly become annoying. Fortunately, it is easy to tell git to cache your login and password information. For example to tell Git to cache your information for 7200 seconds run:
git config --global credential.helper 'cache --timeout=7200'
Use more colour
If you like colour-coded output, tell Git to use such when possible by running:
git config --global color.branch 'auto'
git config --global color.diff 'auto'
git config --global color.grep 'auto'
git config --global color.interactive 'auto'
git config --global color.showbranch 'auto'
git config --global color.status 'auto'
git config --global color.ui 'auto'
Different text editor
When you commit a text editor is run. If you prefer to use another text editor than the default one, run the following command specifying the text editor you prefer:
git config --global core.editor 'vim'
NOTE: You must use quotes around the editor command if it contains spaces.
Different pager
If output is too big to fit on one screen, git will use (if such is installed) a pager program such as “more” or “less”. The default is “less” but sometimes one might want to use another program, or, one might want to specify options to the page program. For example, to have git run less with its -r option, run:
git config --global core.pager 'less -r'
Basic workflow
The following diagram from our youtube talk depicts the basic git workflow and++ associated commands.
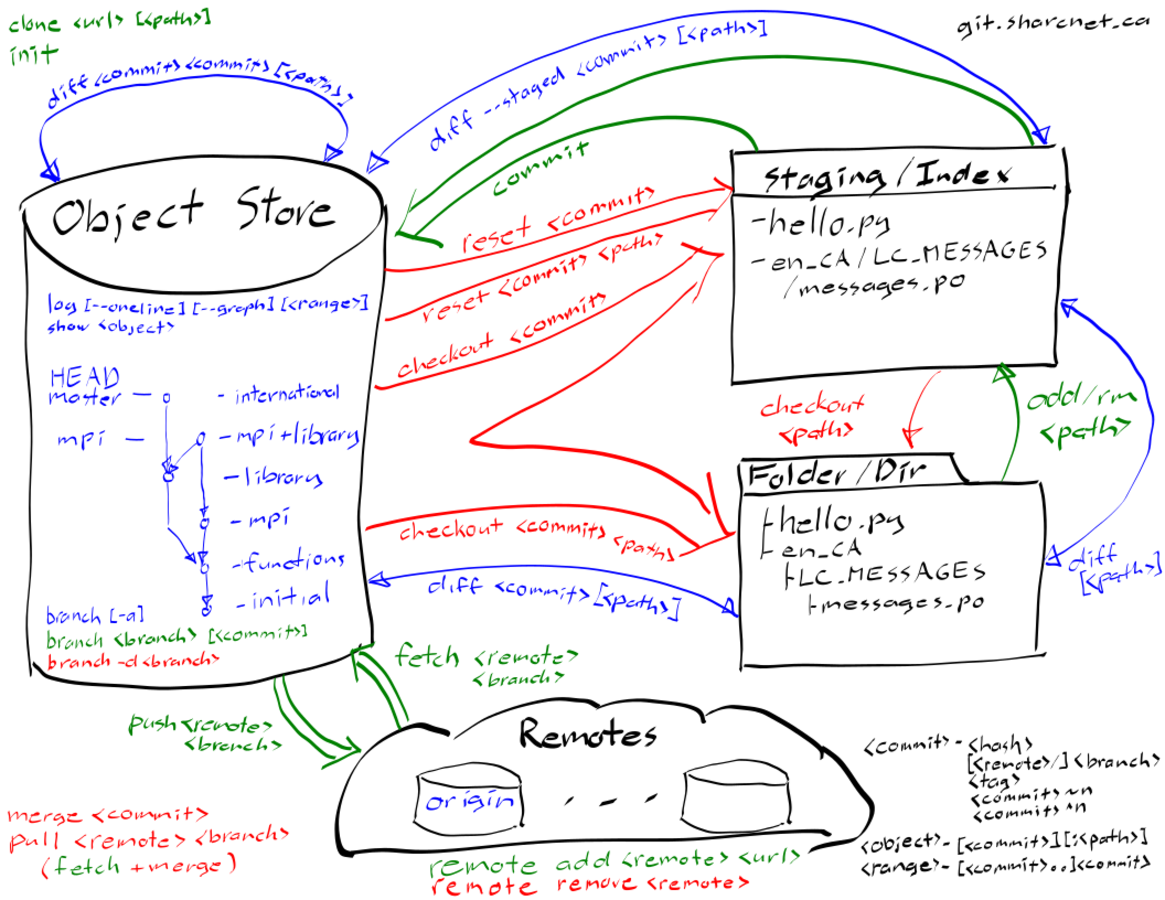
As seen in the diagram, there a four main components when working with git.
folder/directory/working tree - the files that are in the current directory
staging/index - a stored snapshot of the files that is to become the next version
object database/store - the git database where the current and previous versions are stored
remotes - peer git object stores located elsewhere
Although not strictly required, it can be useful to understand the structure of the object store. The object store is just a collection of objects, that is, chunks of data, identified by part of their SHA1 hashes. The types of objects are
blobs - a non-specific object (e.g., the contents of a file),
tree - a collection of blobs and tree references (i.e., a directory),
commit - information about a specific revision, including a commit message, references to parent commits, and an associated tree reference, and
tag - a reference object with a tag message.
The various branches are references to commit objects, which chain together in a directed acyclic graph to produce a history. The index is a tree object. Committing the index creates a new commit object that records the commit message, the current index tree, and current commit object as the parent. The current branch reference is then updated to reference the new commit object.
Local
Working locally with git consists of repetitively working with the files
in the working tree, adding them to the index at some point, and then
committing the index to the active branch at some further point.
Possibly it is easiest to think of the index as the staging area.
Changes/updates are accumulated in it (git add ``<filename>{=html})
until some reasonable state of development is reached, and then they are
committed to the current development branch (git commit).
At any point in time, it is possible to fork off an new branch
(git branch ``<commit>{=html} to create it or
git checkout -b ``<commit>{=html} to create it and switch to it) or
switch to an entirely different development branch
(git checkout ``<commit>{=html}), the later of which will update the
index and the working tree appropriately. Much of the power of git comes
from being able to simultaneously work with several different active
lines of development at once.
Different branches can be brought back together in various ways. It is
possible to take the changes from a single commit from anywhere and
apply it to the current branch (git cherry-pick ``<commit>{=html}). It
is also possible to apply the changes made in another branch to the
current branch. This can be done by applying them on top of the current
work (git merge ``<commit>{=html}) or underneath it
(git rebase ``<commit>{=html}).
Detailed information about all the changes made is available via the
logs (git log ``<commit>{=html}).
Remote
Git is different than revision control software such as SVN in that it does not revolve around a central server. Each git repository is entirely self contained and technically equivalent to all other git repositories. Distributed work relies on a sharing model of swapping changes (commits) back and forth.
While this can be done entirely by email
(git format-patch ``<revision range>{=html} to export and
git am ``<message>{=html} to import), this is usually only the case
for people submitting patches to large open source projects. In a fully
trusted situation, it is usually easier to directly import
(git fetch ``<remote>{=html} or git pull ``<remote>{=html} to fetch
and merge) and exported (git push ``<remote>{=html}) changes to other
repositories.
Although all git repositories are technically equal, it is common for one to be chosen as a stable reference repository, with developers choosing to only export complete and tested changes to it from their personal repositories.
Local work
The following provides some bare basic commands to get you going. It is
strongly recommended to look these commands up in their man pages
(man git-``<command>{=html} or git ``<command>{=html} --help) as
there is a host of useful options and alternative ways they can be run.
Creating a new project
To create a new git project, simply do
mkdir <directory>
cd <directory>
git init
The –shared option can also be specified to setup repository for sharing with other SHARCNET users. See further down{.wikilink} for more details.
Viewing changes
For summary information about what has changed (that is differences that exist between the current branch, the index, and the working tree), run
git status
For more detailed information about what has changed in a particular file run
git diff <filename>
The history of changes can be viewed by
git log
A useful alias for a fancy version of this last command is
git config --global alias.lol 'log --graph --decorate --pretty=oneline --abbrev-commit'
Saving changes
First add the changes to the index via
git add <filename>
The commit the changes by running
git commit
Files can be deleted and moved by git rm and git mv.
Remote work
The following provides some bare basic commands to get you going. It is
strongly recommended to look these commands up in their man pages
(man git-``<command>{=html} or git ``<command>{=html} --help) as
there is a host of useful options and alternative ways they can be run.
This list of remote repositories git knows about can be obtained via
git remote -a -v
Duplicating an existing project
To make a personal copy of an existing repository do
git clone <url>
cd <path>
git config remote.origin.push refs/heads/master:refs/heads/master
This adds a default remote origin for pulling future changes from. The
last two commands set the system up so git push origin will default to
sending any changes made to the local master branch to the remote master
branch.
Adding remotes to an existing project
Remotes can be added to an existing repository by running
git remote add <remote> <url>
git config remote.<remote>.push refs/heads/master:refs/heads/master
git config branch.master.remote <remote>
git config branch.master.merge refs/heads/master
The second line sets the system up so git push ``<remote>{=html} will
default to sending any changes made to the local master branch to the
remote master branch. The third line sets the default remote to the
created remote. The fourth line sets master as the default branch that
git pull will merge into the local master branch.
Pushing and pulling
Assuming the default refspec has been setup, commits can be sent to the remote by running
git push <remote>
Similarly, commits can be brought down from the remote by running
git pull <remote>
Before attempting to send the local changes with the former command, it is usually a good idea to the later command with the –rebase option to incorporate any existing changes present in the remote repository under and the local changes (resolving any issues that arise).
It is also possible to just bring the remote changes into the remote
tracking branch (run git branch -a -v to see these) without merging
for inspection via
git fetch <remote>
All of these commands use refsepcs, which correspond to directories under .git, to specify the movement between local and remote branches. At some point, it is recommend to read the information about this in the git-push, git-fetch, or git-pull man pages in order to understanding the + option and fast forwarding.
Getting help
Git comes with extensive documentation. Run
git ``<command>{=html} --help or man git-``<command>{=html}. A
simple google search will turn
up a wealth of online tutorials in addition to the below reference
links.
References
o Git and SHARCNET (video tutorial):
o Github Help Using Git (cheat sheets, tutorials)
https://help.github.com/categories/19/articles
o GIT Online Documentation
http://git-scm.com/documentation
o GIT Cheat Sheet - Extended Edition
http://jan-krueger.net/development/git-cheat-sheet-extended-edition
o Download Guis
http://git-scm.com/downloads/guis
o Central Repo Howto
http://toroid.org/ams/git-central-repo-howto
o Website Howto
http://toroid.org/ams/git-website-howto
Category:Tutorials{.wikilink}